 Skip to content


How to print my small business thank you cards at home

Want to learn how to print your small business thank you cards at home? Look no further! Today we will learn how to print our Small business thank you cards using a template that we will create in Canva. This will allow us to print multiple cards on one sheet of paper (8.5”x11”). The card size we will be printing is 3”x3”.
If your card is a different size, no worries. This tutorial will work for any size. Just change the size on “Step 10”.
If you don’t want to watch the video tutorial, no problem. Instructions step-by-step down below.
WHAT YOU WILL NEED
- Printer
- Cardstock Paper
- Digital Thank You Card
- Your FREE Canva account
If you don’t have a Canva account, no worries. Just go to canva.com and create your free account today.
LINKS TO THE EXACT ITEMS USED
- HP Tango Smart Wireless Printer
- Pen+Gear Premium White Cardstock, 8.5" x 11", 110 lb., 150 Sheets
- Animal Print Customer Thank You Cards Mix and Match | BTC131_ENG
Some of the links above are affiliate links, which means that when you purchase any of the products we recommend, we may receive a small commission at no additional cost to you. This helps us keep making these videos and blog content. Thank you very much for your support!
STEP-BY-STEP TUTORIAL
Step 1: Login to Canva.com
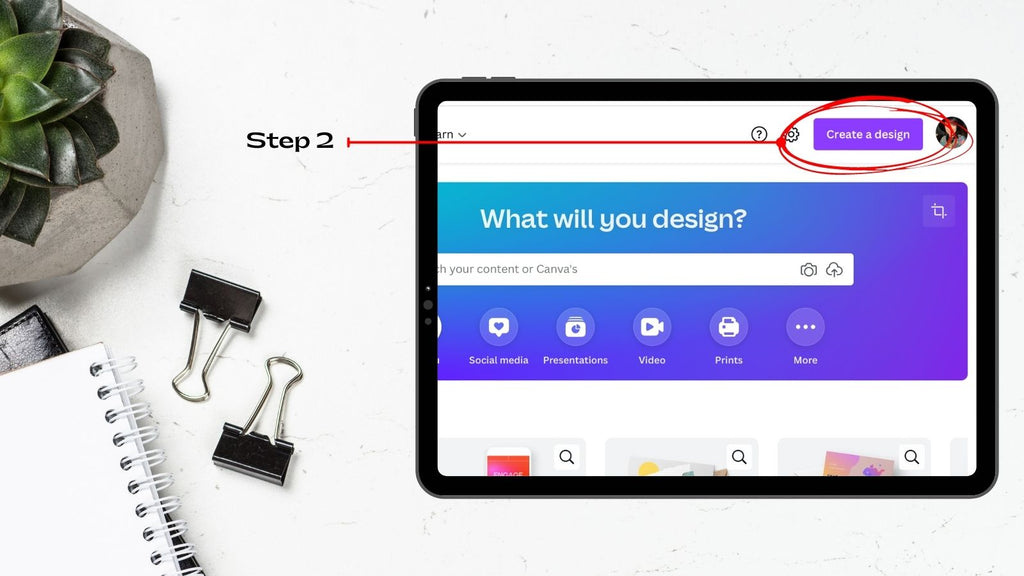
Step 2: Click on “Create a design”
Step 3: Click on the + (plus) sign to create your design

Step 4: Under the section “Custom size” enter 8.5 inside the text box “Width”, 11 inside the text box “Height ”, and under the drop-down list select inches.
Step 5: Click on the button “Create new design”

Step 6: Our new design has been created. Now go to the top left and click on “File”.
Step 7: Under the drop-down list select “Show margins”. You will see a check mark appear on the right side.
Step 8: Here you can see the “margins” which look like little dashes.

Step 9: Click on “Elements”
Step 10: Under the category “Lines & Shapes”, click on the square. The square is going to show up on your page. We want this square to be 3”x3”. What you want to do is click on one of the corners and drag it outward until it’s “w:3 H:3”.
Step 11: The square that you just created 3”x3”, you want to make 5 copies. You should have a total of 6 squares. 3 squares on the left-hand side and 3 squares on the right-hand side. Make sure each row of squares is aligned with each other (see image). Try to stay inside the margins (the dash lines).

Step 12: Click on “text”
Step 13: Select “Add a heading”.
- To edit the text, just double click and start typing.
- To change the font size, font type or color, just single click on the text box.
Step 14: Here we added two text boxes.
- Font Name: Playlist Script
- Font Size: 56pt
- Font Color: White (#FFFFFF)
- Font Name: Glacial Indifference
- Font Size: 21pt
- Font Color: White (#FFFFFF)

Step 15: Click on “File”
Step 16: From the drop-down list select “Show rulers and guides“. You will see a check mark show on the right-hand side. The ruler should appear on the top and left side of your design.

Step 17: Move your mouse to the top of the ruler and left click and drag. You will notice a purple line appear. Drag that purple line and place it on the top edge of the square (see image).

Step 18: You want to repeat step 17. You want to have guides (purple lines) on top and bottom of each square. Also, add guides to the left and righ side of each square as well (see image).
*You don’t want to delete this page. If for any reason you were to delete your guides, you can always go back to this page and add the guides to the edge of each square.
Step 19: Click on the “duplicate page” icon (see image).

Step 20: This is the page that was duplicated on “Step 19“. Select each square on this page and remove. You should only be able to see the guides on the page (see image).

Step 21: Click on “Uploads” (see image)
Step 22: Click on “Upload media” and look for your thank you card on your computer. Once you find it, select it. This will upload your card to Canva.
Step 23: You should be able to see your thank you card. On the picture down below you can see the card we uploaded to Canva. The card is circled in red.
The next step you want to do is click on your card and drag and drop on one of the square areas (see image). If the card is smaller than the square area, you want to click on one of the corners of your card and drag. Make your card fit inside that empty space.
Once the 1st square is the perfect size, just copy the card and place on the next square space. The page should look like image down below, but with your own card.

Step 24: If your thank you card is double sided. Repeat Step 21-23. Down below you can see the back side of our card.

Step 25: At this point you should have 6 cards on your page (see image). The next step is clicking on “Share”.
Step 26: Click on “Download”

Step 27: Under “File type” click on the drop-down list and select “PDF Print”.

Step 28: Under “Select pages” you want to select the pages you want to print. On the picture down below you can see that we selected page 2 and page 3 to print.
Step 29: After you have selected your pages, click on the button “Done”.
Step 30: Click on “Download”. You should be able to see the downloaded file on your computer, smartphone or tablet.
Final Step: Print the downloaded file. Once the card is printed, just cut each card and you are done. That was not that hard!
We hope you enjoyed this tutorial. 😁


JOIN OUR VIP MEMBER LIST
- You will be able to download FREEBIES (free downloads) posted on our blog and much more…
- Join Now
- Just login to your account and start downloading your FREEBIES. That easy!
- Login

FREEBIES 🎁
- This template allows you to print 10 cards per sheet.
- Card size should be 2”x3.5”
- If you would like to purchase digital cards from our store, you can use this template to print these cards
PRINTER TEMPLATE 3”x3”
- This template allows you to print 6 cards per sheet.
- Card size should be 3”x3”
- If you would like to purchase digital cards from our store, you can use this template to print these cards
PRINTER TEMPLATE 4”x6”
- This template allows you to print 2 cards per sheet.
- Card size should be 4”x6”
- If you would like to purchase digital cards from our store, you can use this template to print these cards
- Small Business
- Funeral Thank You Cards
- This template allows you to print 2 cards per sheet.
- Card size should be 5”x7”
- If you would like to purchase digital cards from our store, you can use this template to print these cards
- Small Business
- Funeral Invitation Cards
CLICK ON BUTTON TO DOWNLOAD PRINTER TEMPLATES


COMMENT & SHARE
If you enjoyed this tutorial, please share with family and friends. Don’t forget to leave a comment. This will let us know we are making great content that you enjoy.


Leave a comment